安装需要的依赖
| yum install -y curl-devel expat-devel gettext-devel openssl-devel zlib-devel |
安装编译工具
| yum install -y gcc perl-ExtUtils-MakeMaker package |
检查Git是否安装
| git –version |
安装Git:已经安装过的可以跳过这一步
| yum install git -y |
添加用户并设置密码
| useradd git passwd git |
创建博客目录
| mkdir /home/blog |
给博客目录增加相应读写权限
| chmod -R a+rw /home/blog |
建立Git仓库
| cd /home/git git init –bare blog.git |
给Git目录增加相应读写权限
| chmod -R a+rw /home/git |
新建钩子文件
| vim /home/git/blog.git/hooks/post-receive |
在文件中添加
| git –work-tree=/home/blog –git-dir=/home/git/blog.git checkout -f master |
这句命令是将存储库/home/git/blog.git强制检出并将文件放置到指定的工作树目录/home/blog最终博客生成的静态文件是存储到/home/blog文件夹下的
给钩子文件增加可执行权限
| chmod +x /home/git/blog.git/hooks/post-receive |
安装Nginx
| yum install nginx -y |
启动Nginx
| systemctl start nginx.service |
在浏览器输入ip地址显示:
显示如上,这nginx启动成功
查看Nginx配置文件路径
| nginx -t |
修改Nginx的配置文件
| vim /etc/nginx/nginx.conf |
注意:自己主机上的Nginx的配置文件路径
| server { listen 80; listen [::]:80; server_name 服务器的IP地址或域名; root 博客存放的路径; # Load configuration files for the default server block. include /etc/nginx/default.d/*.conf; error_page 404 /404.html; location = /404.html { } error_page 500 502 503 504 /50x.html; location = /50x.html { } } |
重启Nginx
| systemctl restart nginx.service |
使用Git Bash进入Windows端博客目录
修改Hexo博客的根目录的配置文件
| vim _config.yaml |
到文件底部修改
| deploy: – type: git repo: git@服务器IP或域名:/home/git/blog.git branch: master |
删除本地window的文件
文件路径示例:C:\Users\用户名\.ssh,中的known_hosts.old和known_hosts两个文件。
上传部署
| hexo clean hexo g hexo d |
常见错误
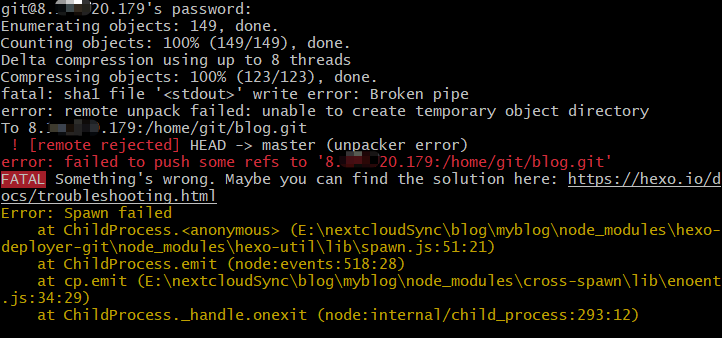
错误原因可能是仓库太干净了,没有README.md文件
在服务器的/home/git/blog.git目录下执行下面指令,让它识别出来是master分支
| echo “My Hexo Blog” > README.md |
再重新上传部署